With every webpage loaded, email sent, or video streamed, network traffic takes a complex journey…
Exoprise recently introduced a new CloudReady setup and deployment method for CloudReady Private Sites that makes it even easier to share CloudReady among teams.
Just to remind readers, a CloudReady Private Site (aka Secure Service) is our agent that runs on any Windows OS for running CloudReady sensors. Ideally, a CloudReady Private Site runs sensors in the same locations and conditions your users are experiencing for end-to-end network monitoring, testing and network assessment. On a small Windows® Virtual Machine (VM) you can easily run 10-15 sensors. We have a Windows® XP VM with 1GB of RAM that runs 15 sensors and has for > 3 years.
Private Sites enable our customers to build their own sensor network wherever they have users and want to monitor Websites, applications and other services. Exoprise also hosts its own Sites, Public Sites where you can deploy sensors. Deploying sensors is the exact same for both public and private sites.
Three Deployment Methods
With that reference material out of the way, let’s start discussing actual setup procedures. Currently, CloudReady supports 3 different types of deployments:
“Get-A-Site” is the new deployment method. We’ll briefly cover the 1 and 2 for comparison.
Guided Deployment
Guided Deployments are completely interactive with the assistance of our Management Client. We recommend customers start off with a Guided install as it helps understand terminology, security, and process. There’s a couple of steps that a Guided Deployment covers:
- Generates and downloads new public/private key-pair for identification, encryption and security
- Tests proxies and required SSL access to https://secure.exoprise.com
- Downloads our Secure Service (our agent) installer, checks code-signing and validate embedded signing keys
- Installs the Secure Service with the client keys and server identification
- Encrypt keys, secrets and other identification information in the Registry using key-chain DPAPI (security)
Guided Deployments assist with key and client-side certificate management, agent installation and validation that everything will be setup correctly. These steps could all be done manually with command line routines but we make it nice and wizard driven.
Bulk Deployment
Bulk deployments are designed for packaging in an MSI for deployment from something like System Center Configuration Manager or Active Directory Group Policy (GPO). With bulk deployment you have to gather a few things:
- Manually generate a new public/private key-pair (you can also reuse an existing key-pair)
- Generate a join key attached to the public/private key-pair. This is like two-factor authentication for the public/private key-pair and also gives additional control around the re-use of the keys.
- Download our agent installer for packaging
- From within a deployment package, execute the the Secure Service installer with arguments for the private key and JOINKEY
More information is available here. The bulk deployment option is perfect for system administrators who want more control and are deploying lots of Private Sites. Bulk deployed Private Sites can also easily be re-imaged and will reattach to the sensors that have been assigned to the site.
The New Get-A-Site Deployment
Our new methodology is called “Get-A-Site” and its quite handy. With the “Get-A-Site” deployments, a CloudReady Administrator (Deployer Role) can generate a new installer with all the settings baked in. An administrator can even configure what the installer will look like – i.e. the different prompts and wizard pages that will show up during installation. This is important if you are giving the installation to a user who is not as technical — you can avoid unnecessary prompts.
Once downloaded, the installer can be given to other people within the organization to setup new Private Sites for monitoring from any location. The download will generate a new public/private key-pair automatically at setup time and attach to the Exoprise CloudReady servers. Customers have used this for:
Setting up Private Sites at Branch Offices
Sometimes a branch office has a separate or occasional IT administrator, possibly in a different timezone. Without full access you can have them install a site and it will be ready for deploying sensors to it in remote locations.
Data Center Installation of a CloudReady Private Site
Often data center admins are a separate group from the admins of Office 365 or other SaaS Applications. With this new deployment method you can give the data center team the CloudReady installation and they can set it up for you.
For Deployment Alongside Different Workloads
CloudReady sites can run alongside anything, the resource requirements are low. With the ‘Get-A-Site’ method you can give an installation to someone who owns a resource, for example a backup Domain Controller, and they can deploy the site.
Delegation of CloudReady Sites for Other Internally Developed Apps
Internally developed apps can be easily tested and monitored with CloudReady. With CloudReady integrated Role-Based Administration and Control (RBAC), different installations can be tied to JOIN keys for easier deployment and internal group use.
Monitoring for Laptop or Roaming Users
Lastly, we have customers that deploy sites to executives that are on the road or working from home. Have a user that is always struggling with performance? Give him a CloudReady site installation for deploying monitoring to his own machine. You can even configure the installation UI so that its a single prompt when he installs.
Once someone executes the ‘Get-A-Site’ installation, the agent attaches to CloudReady with the right organization, keys and settings and is ready for deploying sensors to it.
Overview of The Steps For Generating a CloudReady Setup
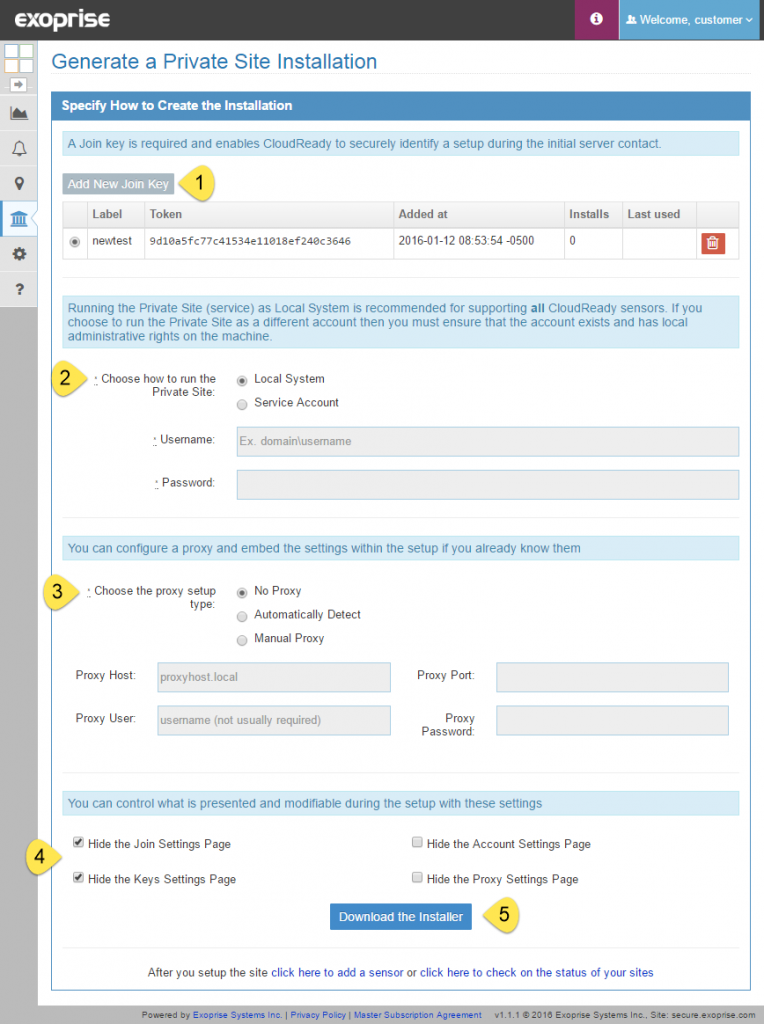
1) Generate a Join key
This securely identifies a CloudReady Installer to your account. It also provides a way for you to control the distribution of the installer. If you remove the JOINKEY, then the downloaded installations become invalid.
2) Configure How You Want The Agent or Service to Run
The service can run as local system (recommended) or a service account for more integration and control within your domain. If you supply an account name then the account MUST exist before you run the setup otherwise it will fail.
3) If You Have a Proxy Installed You Can Configure It In This Step
Many of our customers have proxied Office 365 environments and often want to emulate the end-user experience behind a proxy. CloudReady has, from the beginning, supported proxied environments and they can be configured for the Private Site setup here.
4) Configure What Installation Wizard Pages Will Be Seen During Installation
If you would like the end-user who will be installing the Private Site to have more control over the installation then you can configure what wizard pages the user will be able to see. This enables a setup to be created that can be customized further in each environment.

5) Download the Installer
That’s it. Download the setup and you are ready to install a new Private Site.
Simplifying The Difficult
There you have it. The new Exoprise deployment method utilizes some very clever technology and security methods to make setting up and deploying new CloudReady sites as easy and flexible as possible. Now our customers have more options to control and deploy CloudReady wherever they need monitoring and it’s simple, accessible and controllable.
Related Posts